If this is your first time stopping by, then you might find it helpful to subscribe to the feed, follow on twitter, and become a fan on facebook!
Follow Green Girl on TwitterFan Green Girl on Facebook
Showing posts with label baking. Show all posts

Birthday Time!!! (Marshmallow Fondant Recipe)

|
My little bug turns 5 on Monday. I can't believe it. It seems like she's not supposed to be this big.


We had her party today and it was a total success! Well, unless you factor in the fact that my plan of having everything done the night before did NOT happen... AT ALL! I got all the cakes done literally 10 minutes before people started showing up!

She decided that for this party she wanted tacos and little mini cakes that said "eat me", like in Alice In Wonderland (her favorite movie).

So I started searching around for recipes. I knew I would need a lot of fondant and cakes that could withstand the weight of the fondant. Oh, and a good buttercream frosting recipe! For my fiance's daughters bday last year I used regular, nasty fondant... (But the cake turned out very pretty)

This time I wanted something that was going to taste better. So I decided to try Marshmallow Fondant! I have read many, many blog posts and articles about making MM fondant. In some people said it was soooo easy, but in others people said it was a big sticky mess. I was hoping for a smooth time... and I got it!

To start off I melted 16oz white mini marshmallows (use a good brand if you want a smooth result) with a couple of tablespoons of water by microwaving it in 30 second intervals until smooth. Then I dumped 3/4 of powdered sugar on top.
Next, I covered my working surface with crisco shortening (you will want to use crisco just because it will make it taste better in the end), and then coated my hands (backs, fronts, side, and in between fingers) with it as well. Trust me... do not skip this step because it feels gross... It well definitely be a big sticky mess if you don't.
Turn the MM/sugar out on the working surface and knead it for all your worth... It will seem like it's never going to turn into anything in the beginning, but it will start to come together pretty fast...


and just when you think it's never going to become solid.... 


Viola... you start having fondant consistency! 


Keep kneading it until it is smooth and... 

stretchy. You want it to where you can pull it... 

^^^ like this... without it breaking. 


so when it get to that point, form a ball with it and then wrap it in multiple layers of saran wrap... (I done 3)


Every thing I read said that at this point you should let it sit for a few hours, or if you're making it at night, then let it sit out for over night.
I let mine sit out about two hours and then I put it in the fridge. 
This is not something that you have to do. If you need to use it immediately then just make sure that there aren't any little bits of powdered sugar in it. You might need to add a few drops of water in order to get them all worked out.

In order to get it ready for the fridge you should unwrap it and cover it in a thick layer of crisco shortening. Then wrap it back up and place it in a ziploc bag, being sure to get as much air as possible out. 

MM fondant will store in the fridge for weeks! So take advantage of that fact and make it up a few days ahead. 

When I got up this morning and got it out to use I was immediately horrified because it was solid as a rock. All I could think was, "how the hell am I going to finish these cakes in time!" 
I took a deep breath and relaxed a little and then remember all the stuff I read about this being normal. I took it out of the bag (but left it wrapped) and tossed it in the microwave. I heated it in 10 second intervals for about 30 second total. Turning it over at each 10 second interval. When it was done it was nice and soft again. 

This stuff was amazing... I kneaded it  a few more times and it rolled out PERFECT! It cut smoothly, and not a single piece ripped... at all! 
The best part... 
it tasted amazing!!


I hope you all try this recipe! The cake was pretty awesome as well! The recipes for that and the buttercream frostings coming up next!!! 

Marshmallow Fondant
16 ounces white mini-marshmallows (use a good quality brand)
2 to 5 tablespoons water
2 pounds icing sugar
1/2 cup Crisco shortening (Use as much as you need)

Melt marshmallows and 2 tablespoons of water in a microwave or double boiler. To microwave, place the bowl in the microwave for 30 seconds, open microwave and stir, back in microwave for 30 seconds more, open microwave and stir again, and continue doing this until melted. It usually takes about 2 1/2 minutes total.
Place 3/4 of the powdered sugar on the top of the melted marshmallow mix.

Now grease your hands completely (palms, backs, and in between fingers), then grease the counter you will be using and dump the bowl of marshmallow/sugar mixture in the middle.

Start kneading it and keep going until you get a firm, smooth, elastic fondant. You can add more powdered sugar to help it come together. If it seems dry, add some water, a drop at a time, and knead it in. It took me about 5-7 minutes to get it worked out.


My Carrot Cake Blunder

|
I have recently subscribed to a blog called "Bittersweet." The writer done this whole Alice in Wonderland theme with his recent posts. One of them was The White Rabbit's Quick Carrot Cake. It sounded so yummy so I thought what the hey, I'll make it. I went to the store, got everything, and then came home and printed out the recipe. To my surprise I realized that in my excitement I must have not read the full recipe..... It said to microwave it. Now, I have nothing against microwaving anything, but

Me + Cake + Microwaving... It just isn't going to happen. 

I have to give the guy credit though... His cake looked AWESOME! So I decided to alter the recipe a little to fit how I like to cook! If you're looking for a yummy, super quick, and super simple carrot cake recipe... then head over to Bittersweet to check his out! 
         If you want to bake it... then stick around!

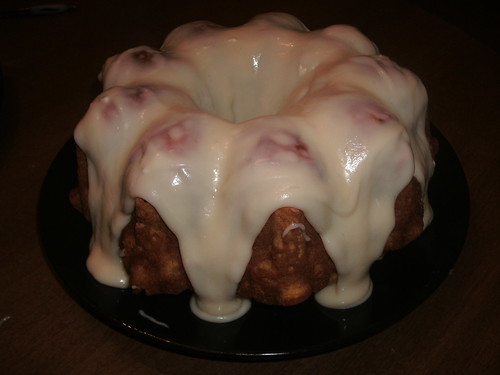
Quick and Simple Carrot Cake with Cream Cheese White Chocolate Glaze 


1 box of white or yellow cake mix *I used white*
1/3 cup vegetable oil
3/4 cup water
3 egg whites
1 teaspoon vanilla
2 tablespoons pumpkin pie spice
2 cups grated carrots
1 cup white chocolate chips
4 oz cream cheese, softened
3 tablespoons milk 

First things first... you need a great helper like mine! 
(please ignore the horribly messy bookshelf in the background)

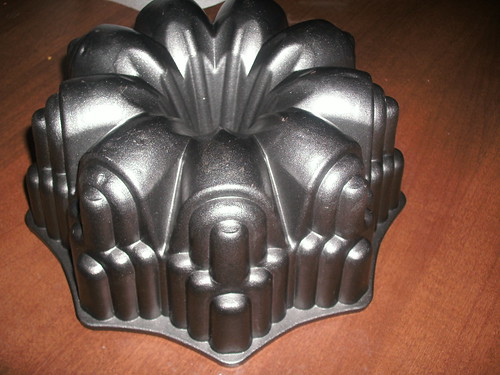
Once you've got that all squared away you should preheat your oven to 350F and grease and flour your bundt pan (you could use any pan you wanted, but I used what I call my cathedral bundt pan.

It's my favorite.


Tip Time: When grating your carrots, you'll want to make sure that you get as much water as possible out! Usually I will use cheesecloth to wring it out, but I was fresh out. So, I tried blotting with paper towels,

which didn't work. I ended up just wringing them out very carefully with paper towels.

After you get your carrots done mix them with the cake mix, oil, water, egg whites, vanilla, and pumpkin pie spice. This is where your eager helper comes in handy. They love to stir!!!


Once you get it mixed well, pour it into your prepared pan.


Bake at 350 for 35-40 minutes. If you see that the edges are looking a little more brown than you'd like and the center isn't done yet, you can sit your bundt pan on a cookie sheet to slow it down.

Remove from oven when a toothpick inserted, comes out clean.


Let sit in pan for 5 minutes, then flip out onto a plate.


Let cool completely (c-o-m-p-l-e-t-e-l-y)

When cool melt white chocolate (30 second intervals in the microwave) and beat it with the cream cheese. Add 1 T of milk at a time until you've reached the perfect consistency to glaze.


Spoon over cake, slice, and enjoy!!!!


Other Words From Around The Web

|
I sat down with my google reader tonight, and noticed that there were a lot of great things recently posted. I thought I would post some links here so you can go look for yourself.

It is the first of the month so all the coupons and sales have reset.

-Check out Surviving The Stores for some of the latest deals at Walgreens, Rite Aid, and CVS.

-Then if you're looking for some good coupons head over to Money Saving Mom

Now on to some yummy food...

-Check out this great looking Beet Hummus at Simply Recipes.

-And as usual, Bakerella whipped up something yummy! Her Red Velvet Cake looks so good!

-Zesty Cook posted a yummy recipe for Homemade Bubbly Beer Bread (say that 5 times fast).

-Last, but not least... this Chocolate Tart is going to be the death of me. The moment I seen it over at Homemade Mothering, I knew I had to make it!

Hope you enjoy!

.

Country Biscuits

|
I spent most of my early twenties looking for the perfect biscuit recipe. It took me a while, but I finally found it. So I thought I would share it all with you!

Country Butter Biscuits

1/3 c Shortening
2c all purpose flour
3 t baking powder
1 t salt
1/4 c FIRM butter
about 3/4 c milk

Preheat oven to 450. Combine flour, baking powder, and salt in a bowl. Cut shortening into mixture until it resembles fine crumbs (I use a fork for this). Cut butter into 1/4'' pieces (I cannot stress how important it is to keep the butter chilled and firm for this). Toss with flour mixture (Do not mash them down.) Stir in just enough milk till dough balls up and leaves the sides of the bowl (it usually takes the entire 3/4c plus about another T. for me).

Turn dough onto lightly floured surface. Gently roll to coat with flour. Now here is the trick to getting perfect fluffy, flaky biscuits. You do NOT want to over work the dough. It will make them dry and dense. I usually knead my dough about 10 times. Also, if you will fold the dough, then mash it down instead of kneading it with your fists, it will create the layers.

So fold it over itself and knead about 10 times. Then roll or pat dough out to about 1/2'' thick and cut with floured 3'' cutter. Place 1'' apart on an ungreased baking sheet and bake for about 12-15 mins. Remove immediately and brush tops with melted butter!

Recipe catch up!

|
I have been a little behind on my blogging. I have cooked a lot of things recently that I haven't blogged about. So I'm going to try and write a few posts with all the recipes in them. Out of everything I've cooked lately only one thing didn't turn out as I planned, and that's the Cinnamon Bubble Bread I baked. I got the recipe out of a cookbook called The Best Casserole Book Ever by Beatrice Ojakangas. I honestly think that this bread would turn out perfect had I given it the chance, but sadly it was the last thing I baked that day. So I was exhausted and ready to get out of the kitchen. Here is the recipe. I urge you to try it and let me know your results! 


Cinnamon Bubble Bread

The “bubbles” in this loaf of bread are little rounds of dough, which are rolled in cinnamon and sugar, and then piled into a baking pan. The bread tastes a lot like cinnamon rolls, and is fun to serve for breakfast or brunch, or with coffee. Use two forks or a pair of tongs to pull apart the bubbles.

Serves 8 to 10


6 T butter, melted, divided, plus extra for the dish
1 C warm water (105 to 115°)
2 packages (1/4 oz each) active dry yeast
2 T plus 1 C sugar, divided
1 C milk, scalded and cooled, to lukewarm
2 t salt
4 ½ C all purpose flour, divided
2 T ground cinnamon


1. Generously butter a deep 2-quart casserole dish. Pour the warm water into a large bowl and stir in the yeast and the 2 T of sugar. Let stand until foamy, about 5 minutes.


2. Add the milk, salt, 4 T of the melted butter, 1 C of the flour, and ½ c sugar; beat until smooth. Gradually beat in the remaining flour to make a stiff, satiny, smooth dough.


3. Cover with a kitchen towel and let rise until doubles in size, about 45 minutes. Turn out the dough onto a lightly oiled work surface. Divide the dough into quarters. Divide each quarter into quarters again, to make 16 pieces. Cut each of the pieces in half to make 32 pieces total.
4. Pour the remaining 2 T melted butter into a small dish. In another small dish mix the remaining ½ c of sugar and the cinnamon. Roll each piece of dough first in the butter and then in the cinnamon sugar. Place the dough pieces in the buttered casserole in even layers. Cover with a kitchen towel and let rise in a warm place until doubled in size, about 45 minutes.


5. Meanwhile, preheat the oven to 375°. Bake the bread for 35 to 40 minutes, or until browned and a skewer inserted in the center of the loaf comes out clean. Cool in the casserole for 5 minutes. Invert onto a serving dish and serve warm, pulling apart the pieces.

My day in the kitchen

|
I have been inspired. The lady over at Life As A Mom cooked up a storm the other day. Putting all sorts of things away in the freezer. So today, I will get things done! Here is my list of things to work on... 

Pumpkin Pancakes
Herbed Tomato Sauce
Taco Seasoning Mix
Cinnamon Bubble Bread
Fast and Easy Whole Wheat Bread
Southern Biscuits
Strawberry Bread
Pumpkin Muffins
Basic Whole Wheat Pancakes
Fresh Strawberry muffins
Pimento Cheese spread
Chewy granola bars


Then here are my maybe's :) 

Apple Cider Donuts
White Chocolate Cinnamon Toast Crunchers
Cookie Dough Pie


I would also like to find some homemade mix recipes, such as, brownie mixes, cake mixes, ect... to make up and put away. 


Well, I'm off. I'll update as I get things finished... 


Related Posts with Thumbnails